15. September 2016

Run Javascript in shell: The ultimate shebang collection

Today, let’s try the tip format. Don’t worry, we’ll introduce some nice modules along the way.

Thanks to node, Javascript conquered new realms, including the terminal. To integrate with other tools, or just for convenience, you may want to run your JS code as a shell script. This is done with a shebang), of course. Sam Mikes cleverly devised a shebang that allows running a node script as a shell script:

First some initialisations:

mkdir ... ; cd ...
npm init
chmod +x index.js //< note this
npm i --save hello-world-emo  // for testing purpose

Then in index.js: (note the 2-lines shebang at start)

#!/bin/sh
':' //# http://sambal.org/?p=1014 ; exec /usr/bin/env node "$0" "$@"
'use strict';

// let's visually inspect parameters
process.argv.forEach((val, index) => console.log(`arg #${index} = "${val}"`))

// test non-trivial code by using a module
const { hello } = require('hello-world-emo')
process.argv.slice(2).forEach(val => hello(val)) // say hello to everyone

In case you wondered, node will detect and skip the shebang, so this is syntactically valid (more info). Then from your terminal:

$ ./index.js Joe Jack
arg #0 = "/home/offirmo/.nvm/versions/node/v6.5.0/bin/node"
arg #1 = "/home/offirmo/[redacted]/index.js"
arg #2 = "Joe"
arg #3 = "Jack"
[hello-world-emo] Hello from [redacted]/node_modules/hello-world-emo/dist/index.node-stable.js
Hello, Joe :-(
Hello, Jack :-(

It works! Same behaviour as running node index.js Joe Jack.

Let’s do better: how about running pure ES6 code using ES6 modules ? The babel-node executable, exposed by the babel-cli npm module and a trivial bit of config allows that:

npm i --save  babel-cli  babel-preset-es2015-node6
echo '{ "presets": ["es2015-node6"] }' > .babelrc
touch index_es6.js; chmod +x index_es6.js

The shebang and the code becomes:

#!/bin/sh
':' //# http://sambal.org/?p=1014 ; exec `dirname $0`/node_modules/.bin/babel-node "$0" "$@"
'use strict';

import { hello } from 'hello-world-emo' //< note the change to ES6 modules
process.argv.slice(2).forEach(val => hello(val))

And sure enough:

$ ./index_es6.js Joe Jack
[hello-world-emo] Hello from [redacted]/node_modules/hello-world-emo/dist/index.node-stable.js
Hello, Joe :-(
Hello, Jack :-(

Direct execution, not even needing a build step! Please note that the Babel team doesn’t endorse using this utility in production, but YMMV.

Last, how about doing it for typescript ? We’ll need typescript of course (targeting typescript v2 here, which is vastly superior to v1 and due to be released anytime soon), node.js type definitions and the ts-node npm module:

npm i -S  typescript@2  @types/node  ts-node
touch index.ts; chmod +x index.ts

The shebang and the code becomes:

#!/bin/sh
':' //# http://sambal.org/?p=1014 ; exec `dirname $0`/node_modules/.bin/ts-node "$0" "$@"
'use strict';

/// <reference path="node_modules/@types/node/index.d.ts" />
import { hello } from 'hello-world-emo'
process.argv.slice(2).forEach((val: string) => hello(val)) //< sprinkled some typescript here

And as expected:

$ ./index.ts Joe Jack
[hello-world-emo] Hello from [redacted]/node_modules/hello-world-emo/dist/index.node-stable.js
Hello, Joe :-(
Hello, Jack :-(

That’s all. Let’s start writing great Unix tools and utilities now!

Modules introduced:

07. September 2016

3 modules to check, enforce or prevent running in sudo mode

As I wrote in an earlier post, I’m open for guest writers to contribute to Daily-JavaScript. This week’s post comes from Offirmo Neet. Offirmo approached a couple of weeks ago, asking me if I needed any help bearing the load of the daily production of content.

He also told me he was saddened by the news that Alex Young had stopped writing for DailyJS and is very eager to help create an alternative.

So, with no further ado I will give the word to Offirmo.

3 modules to check, enforce or prevent running in sudo mode

Sindre Sorhus gets us covered with 3 complementary modules about running an app as root:

As you know, Unix programs can be run with “root privileges” usually by starting them with sudo. The “root” user has all permissions, which is in important security concern.

When writing a CLI app in javascript, you may want to check if your app is run with root privileges with the 1st module is-root:

const isRoot = require('is-root')
console.log(`You are ${isRoot() ? 'root' : 'not root'}.`)

Which gives you:

$ node ./index.js
You are not root.
$ sudo `which node` ./index.js   <-- note: find userland node if not installed as root
You are root.

If your app doesn’t need superuser rights, you can protect the user by refusing to be run by sudo with the 2nd module sudo-block:

const sudoBlock = require('sudo-block')
sudoBlock()

If run as root, the library call will crash the process and gives explanations and solutions:

$ sudo `which node` ./index.js
You are not allowed to run this app with root permissions.
If running without sudo doesn't work, you can either fix your permission problems
or change where npm stores global packages by putting ~/npm/bin in your PATH and running:
npm config set prefix ~/npm

See: https://github.com/sindresorhus/guides/blob/master/npm-global-without-sudo.md

Even better, instead of stopping, you can attempt to gracefully downgrade those rights for safety with the 3rd module downgrade-root:

const downgradeRoot = require('downgrade-root');

try {
    downgradeRoot()
    console.log('You were root: privileges relinquished.')
} catch (err) {
    console.error('You are root and I couldn’t downgrade permissions !')
    process.exit(1)
}

If run as root and if everything goes well, you’ll see:

$ sudo `which node` ./index.js
You were root: privileges relinquished.

Wrapping all together gives us the best solution to avoid running as root:

const isRoot = require('is-root')

if (isRoot()) {
    console.log(`You are root!`)
    try {
        require('downgrade-root')()
        console.log('root privileges relinquished.')
    } catch (err) {
        console.error('Couldn’t downgrade permissions !')
        require('sudo-block')()
    }
}

For more information and demo’s on how to use this check out the READMEs:

02. September 2016

React Storybook Info Addon

@kadira/react-storybook-addon-info (GitHub: kadirahq/react-storybook-addon-info, License: MIT, npm: @kadira/react-storybook-addon-info)

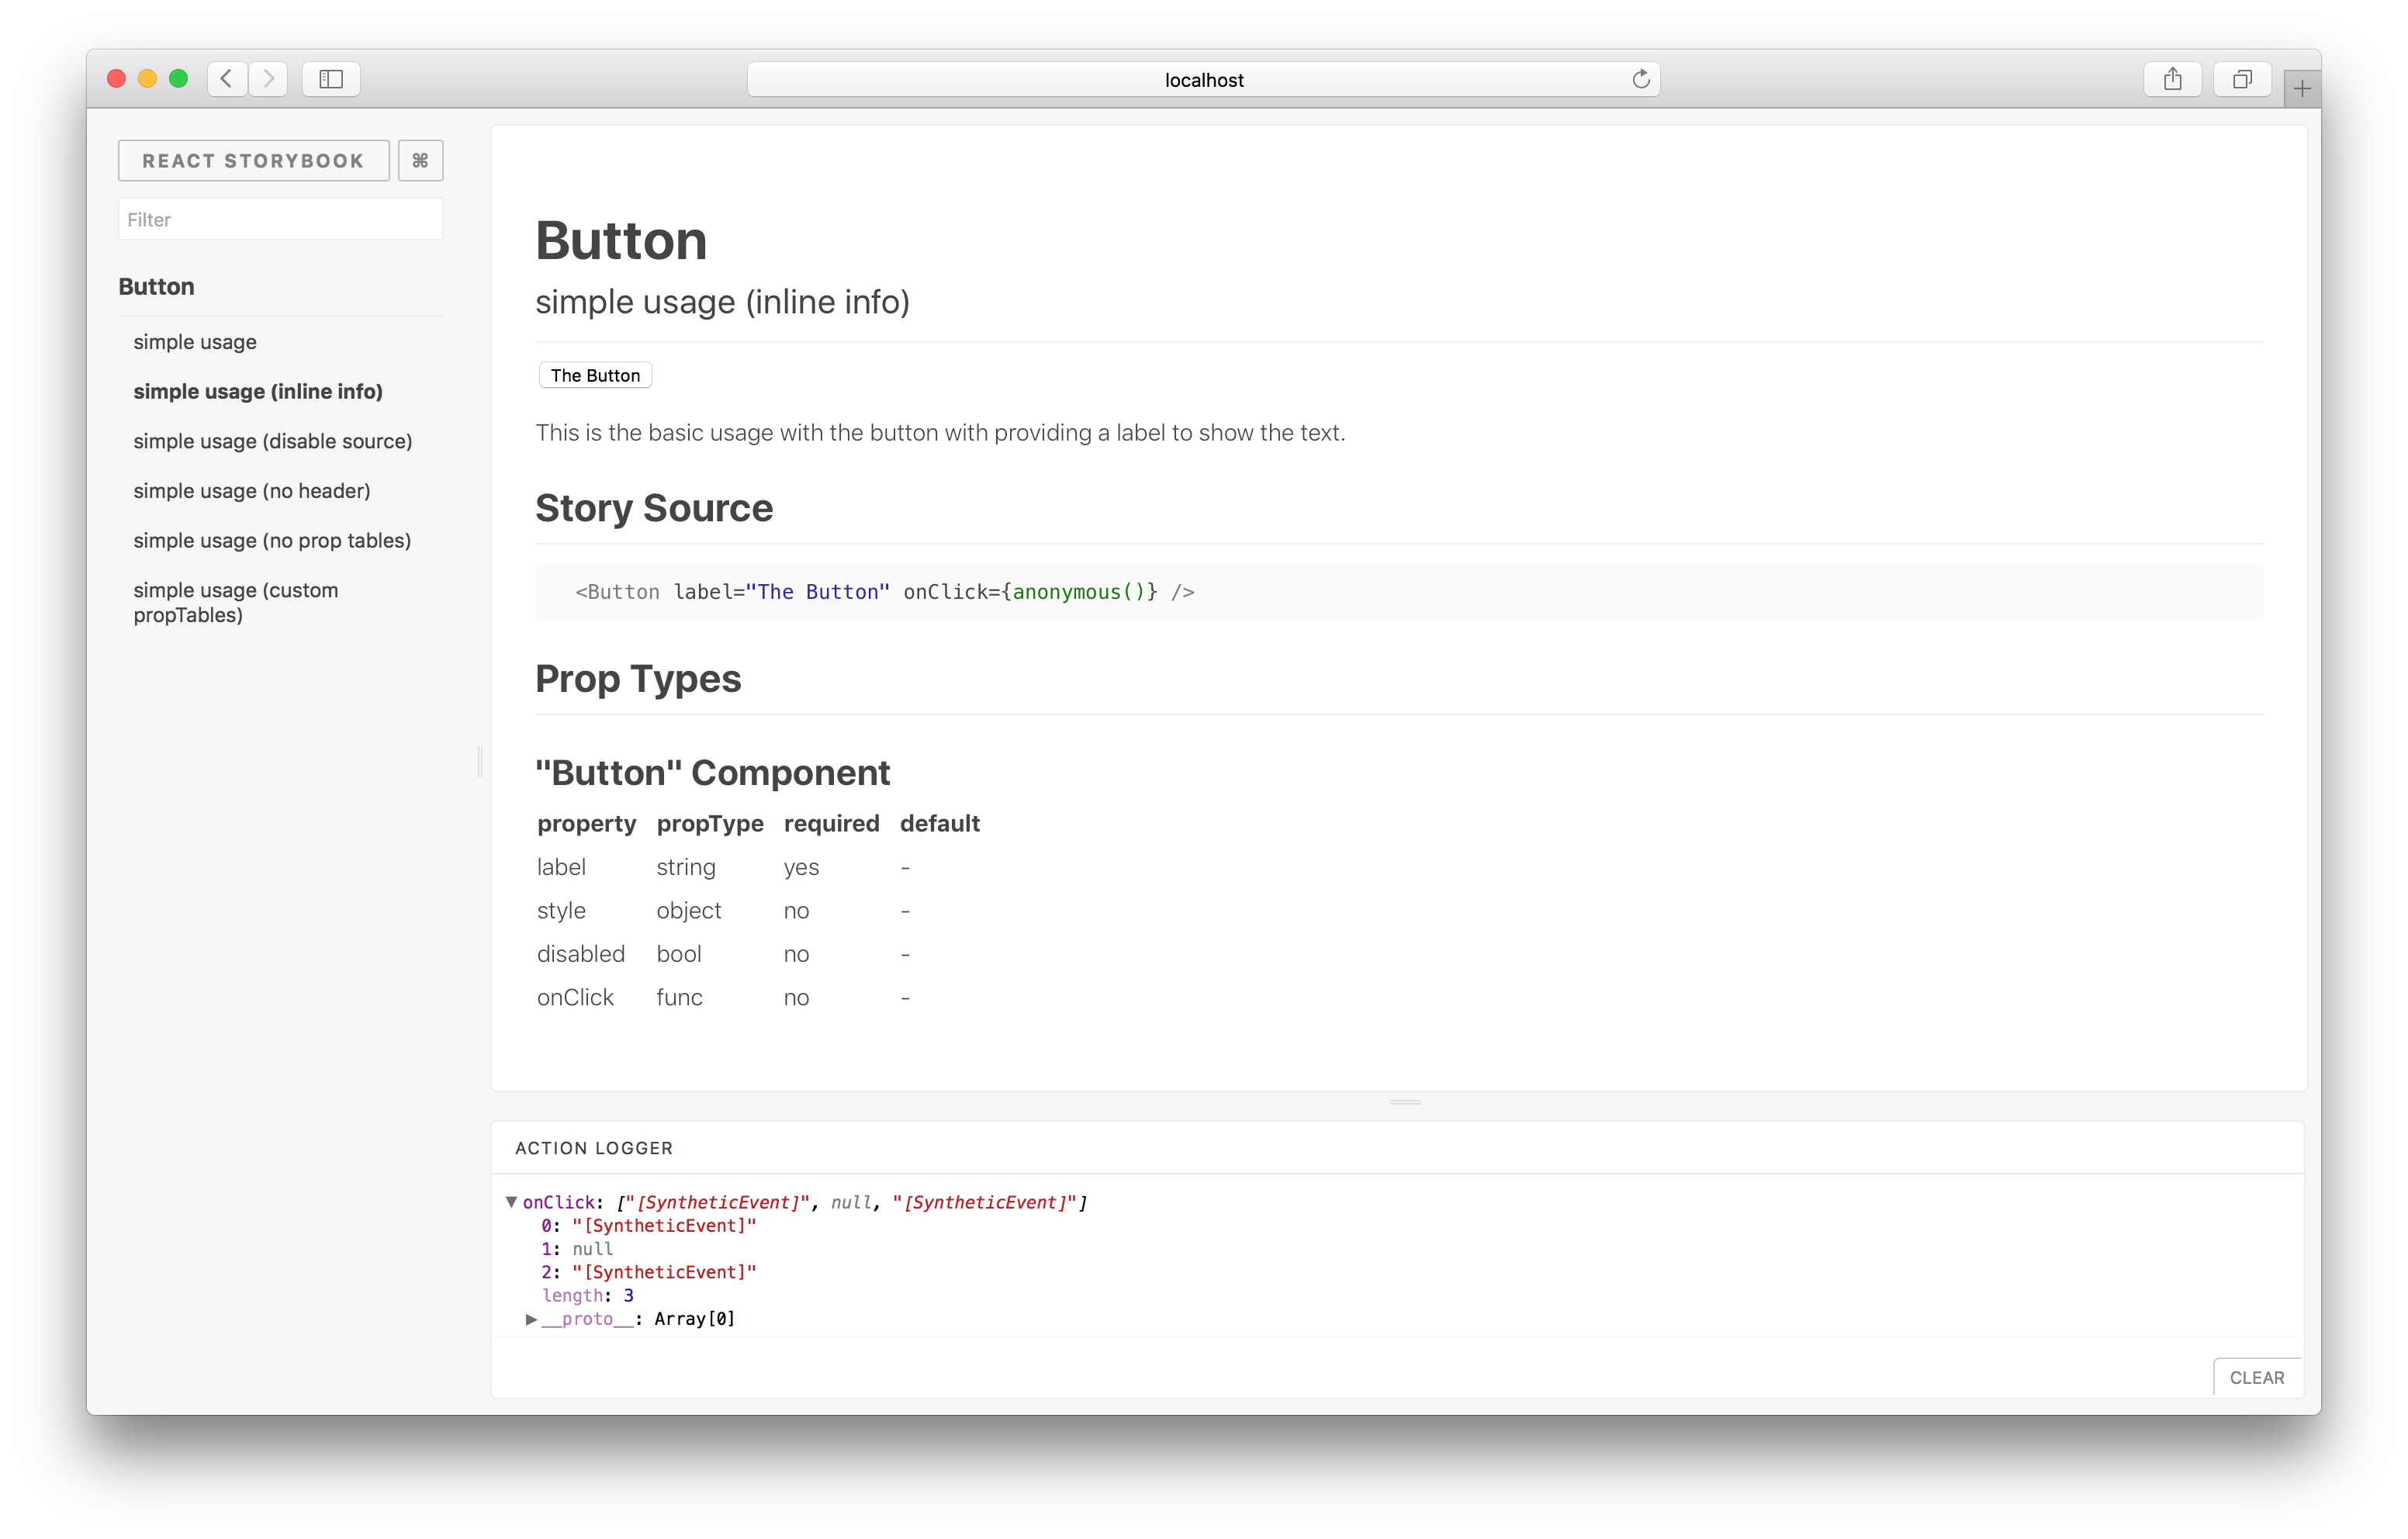
In April I did a mention of React Storybook. If you are not familiar with Storybook yet, it provides you with an isolated environment to create your React components in. Over the past couple of months there has been a lot of development on the project, like patching bugs, adding features and one of the most amazing things about the new version is the add-on support. There have being a few add-ons created already, but today we will be having a quick look at the react-storybook-addon-info.

The info add-on let’s you use React Storybook as a living style guide with usage documentation. When using propTypes or defaultProps it will pick them up and present them in a table so you have an overview of whats possible with the component.

Reminder: A normal story looks like this:

 storiesOf('Button')
   .add('without text', () => (
     <Button onClick={action('onClick')} />
   ));

Once react-storybook-addon-info is configured it will provide you with the addWithInfo function on the storyOf object, which can be used like this:

storiesOf('Button')
  .addWithInfo(
    'without text', // Name of the state
    'The Button rendered without any text.', // description
    () => (<Button onClick={action('onClick')} />) // Your component
  );

This will give you a [?] in the top right corner of the Storybook preview. Once you click that you will be presented with a page like this:

For more information and demo’s on how to use this check out the README

29. August 2016

Apollo Server

Apollo Server (GitHub: apollostack/apollo-server, License: MIT, npm: apollo-server)

Apollo Server is an easy to set up GraphQL server that works with all the major Node.js HTTP server frameworks: Connect, Express, hapi and Koa. Contrary to Facebook’s own express-graphql middleware, which serves mainly as a reference implementation, Apollo Server’s goal is to be a complete production-ready GraphQL server.

In case you’re not familiar with GraphQL: GraphQL is a data query language created by Facebook that’s meant to solve the drawbacks of REST APIs. For a more in-depth introduction I recommend heading over to the GraphQL website.

In order to get started with Apollo Server, you need to install it first:

npm i apollo-server --save

To use Apollo Server with hapi, you can configure your server like:

import hapi from 'hapi';
import { ApolloHAPI } from 'apollo-server';

const server = new hapi.Server();

const myGraphQLSchema = // ... define or import your schema here!
const HOST = 'localhost';
const PORT = 3000;

server.connection({
  host: HOST,
  port: PORT,
});

server.register({
  register: new ApolloHAPI(),
  options: { schema: myGraphQLSchema },
  routes: { prefix: '/graphql' },
});

Configuring Apollo Server is done by passing an object with the following properties:

const ApolloOptions = {
  schema: GraphQLSchema,
  context?: any, // value to be used as context in resolvers
  rootValue?: any,
  formatError?: Function, // function used to format errors before returning them to clients
  validationRules?: Array<ValidationRule>, // additional validation rules to be applied to client-specified queries
  formatParams?: Function, // function applied for each query in a batch to format parameters before passing them to `runQuery`
  formatResponse?: Function, // function applied to each response before returning data to clients
});

Apollo Server also comes with its own interactive, configurable in-browser GraphiQL IDE implementation that makes it easy to test your GraphiQL queries.

For more on Apollo Server (and the complete Apollo Data Stack) and to learn how to run your own GraphQL server, head over to the website.

24. August 2016

Slow deps

slow-deps (GitHub: nolanlawson/slow-deps, License: Apache-2.0, npm: slow-deps)

When working on a larger Javascript project, over time your dependency tree will grow and with that the installation time will grow as well. With every new dependency of your project, npm needs to fetch it and check if that dependency has other dependencies et cetera.

I think that in all of us the curiosity grows which dependency is slower, so you might want to consider an alternative, dropping it all together or look for other ways of speeding up the installation process to in turn reduce the total build time.

To give insight into which dependency is the bottleneck of your installation process Nolan Lawson created a very nice utility called slow-deps.

The easiest way to a quick insight you can install it in a global context like so:

[sudo] npm i slow-deps -g

Now you can go into the project directory you want to test and run:

slow-deps

slow-deps will take all your project dependencies, devDependencies and optionalDependencies and installs each one in a temporary directory with a temporary cache and measures the install time per package. Each dependency is then listed from slowest to fastest.

As an example this is what it outputs for the A-frame project:

Analyzing 45 dependencies...
[====================] 100% 0.0s
---------------------------------------------------------------
| Dependency                    | Time     | Size    | # Deps |
---------------------------------------------------------------
| semistandard                  | 1m 14.4s | 24 MB   | 242    |
| tween.js                      | 1m 10.7s | 22 MB   | 250    |
| budo                          | 1m 1.4s  | 14 MB   | 275    |
| mozilla-download              | 49.3s    | 26 MB   | 194    |
| karma                         | 39.8s    | 16 MB   | 153    |
| snazzy                        | 36.2s    | 9.7 MB  | 146    |
| karma-coverage                | 26.7s    | 8.0 MB  | 99     |
| browserify                    | 23s      | 6.4 MB  | 118    |
| codecov                       | 17.8s    | 3.9 MB  | 73     |
| istanbul                      | 12.1s    | 6.5 MB  | 55     |
| minifyify                     | 11.4s    | 4.8 MB  | 48     |
| browserify-css                | 10.7s    | 4.0 MB  | 29     |
| document-register-element     | 9.7s     | 62 KB   | 0      |
| browserify-derequire          | 9.5s     | 1.7 MB  | 42     |
| mocha                         | 7.2s     | 1.3 MB  | 34     |
| gh-pages                      | 6.2s     | 3.7 MB  | 22     |
| three                         | 5.5s     | 10.0 MB | 0      |
| sinon                         | 5.3s     | 1.0 MB  | 5      |
| karma-browserify              | 5.2s     | 1.0 MB  | 9      |
| webvr-polyfill                | 4.2s     | 898 KB  | 2      |
| karma-mocha-reporter          | 4s       | 104 KB  | 7      |
| uglifyjs                      | 3.9s     | 752 KB  | 6      |
| rimraf                        | 3.6s     | 157 KB  | 11     |
| karma-sinon-chai              | 3.2s     | 146 KB  | 1      |
| replace                       | 3s       | 341 KB  | 7      |
| chai                          | 2.8s     | 438 KB  | 3      |
| karma-mocha                   | 2.8s     | 18 KB   | 0      |
| karma-chrome-launcher         | 2.6s     | 56 KB   | 5      |
| browserify-istanbul           | 2.5s     | 84 KB   | 5      |
| exorcist                      | 2.5s     | 143 KB  | 6      |
| lolex                         | 2.3s     | 122 KB  | 0      |
| karma-env-preprocessor        | 2.2s     | 5.8 KB  | 0      |
| mkdirp                        | 2s       | 47 KB   | 2      |
| chai-shallow-deep-equal       | 2s       | 17 KB   | 0      |
| husky                         | 2s       | 14 KB   | 1      |
| karma-firefox-launcher        | 1.9s     | 13 KB   | 0      |
| deep-assign                   | 1.9s     | 11 KB   | 1      |
| sinon-chai                    | 1.9s     | 18 KB   | 0      |
| debug                         | 1.5s     | 37 KB   | 1      |
| object-assign                 | 1.3s     | 7.4 KB  | 0      |
| open                          | 1.3s     | 26 KB   | 0      |
| karma-chai-shallow-deep-equal | 1.2s     | 6.8 KB  | 0      |
| present                       | 1.1s     | 12 KB   | 0      |
| promise-polyfill              | 1.1s     | 17 KB   | 0      |
| style-attr                    | 1s       | 6.5 KB  | 0      |
---------------------------------------------------------------
Total time (non-deduped): 9m 2s
Total size (non-deduped): 167 MB

For more documentation I would refer you to the Github repo.

Note: I started asking for a bit more help with generating more content for this page. In the future you will be able to find tricks, tips and tutorials on this site as well.

If you are interested in writing some content for this site please contact me with a pitch.